One of these problems is that the printer shows an offline status even when it is connected properly. Before we start, make sure that your printer is connected properly with all the power outlets as well as you are connected to the network.
Solution 1: Reconnect Printer to Wi-Fi
Before we refer to other workarounds, first we will reconnect your printer your Wireless router. You can forget wireless router from your Canon printer by accessing its settings. Then you can reconnect it from scratch. We have demonstrated how to connect a wireless network to a specific canon printer. Your model might be different but the steps are more or less the same.
The light will keep blinking while searching for available networks. It will also keep blinking when it is connecting to the access points. When the printer successfully connects to the access point, the light will remain lit. WPS button on your router is present somewhat to its side. If you don’t want to use the WPS method to connect to your network, you can use the settings on your printer LCD and connect accordingly.
Solution 2: Restarting the Spooler service
The spooler service is a software program that is responsible for managing all print jobs being sent to the computer printer. The print spooler service is usually visible to users and they can also cancel a print job that is being processed. It also allows them to manage jobs that are currently on the waitlist. We can try restarting this service and check if this solves the problem.
Permission might be needed to access the following folder. If prompted, press Continue.
Solution 3: Disabling “Use Printer Offline” using Settings application
Another workaround for this problem is taking away the capability of your computer to work with this printer when it is offline. This will ensure that your printer only works when it is properly connected to your computer. You can always revert the changes back if this doesn’t solve anything for you.
Solution 4: Updating Printer Drivers
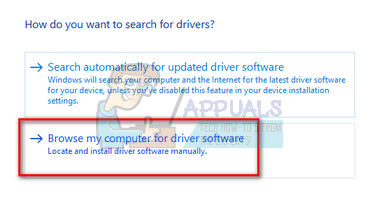
If both the above solutions don’t work, it means there is a problem with the driver of your printer. We can try uninstalling them first and then reinstall them manually. You can download the official Canon drivers from their official website.
Select the driver file you downloaded using the browse button when it appears and update it accordingly.
Note: If you can’t update the drivers manually, you can also select the first option “Search automatically for updated driver software”. This option will make Windows search the web automatically and select the best driver out there.
Solution 5: Unchecking option “SNMP Status Enabled”
Simple Network Management Protocol (SNMP) is a popular protocol used for network management. It is used to collect information from printers and managing them accordingly. We can try disabling this protocol and check if this makes any difference in our case.
Solution 6: Allotting Printer a Static IP Address
If you are using your printer over Wi-Fi, it is possible that you are having IP address problems. Whenever your printer connects to your router, it says hi and asks the router to assign an IP address to the printer. Suppose the router assigned “…20” to the printer. After you successfully print all your documents, you turn the printer off. Now someone from your house connects his iPad to the router. Since the IP “…20” isn’t in use with the printer anymore, the router assigns this IP to the iPad. Whereas on the other hand, your computer remembers the printer by “…20”. When you open your printer, it will be assigned a new IP “suppose …21”. Now even though it will be connected to the network perfectly, your computer will not recognize it. The solution to this problem is to allot a static IP address to the printer. Take a look at the steps listed below:
Type the following command with a new IP address following it:
As you can see, the IP address is already taken. We are pinging the target location which is giving us a valid response. Try other IP addresses until you find the one which isn’t taken by any other device.
In this case, the IP wasn’t taken so we can use it.
Menu -> Interface Setup -> TCP/IP -> IP Mode and make sure it is set to “Manual“Menu -> Interface Setup -> TCP/IP -> IP Setting -> IP Address and set it to address determined above (192.168.8.102 in our example.
Set each field in the address using the OK button to activate a field (large cursor box appears), then right and left arrow keys to adjust, then OK Move to next field in the address with the right arrow, then repeat above When done setting address, press the Up arrow until you see “Save TCP/IP setting?”, then press OK.
FIX: Steps to Fix Canon Printer Error 5C20Fix: Canon printer not respondingFIX: Resolve Canon Printer Error C000SOLVED: Error E05 on Canon Printer


