Some preliminary measures are there to prevent SearchIndexer.exe from consuming further machine’s memory, like disabling the service from Task Manager and Setting up an Affinity that limits the number of system’s cores for the program to run—should not be considered as a permanent solution but certainly suffice to temporarily solve the problem for some users. searchindexer.exe is built-in Windows service that handles indexing of your documents for the Windows Search, which sparks up the file search engine built into the Windows that powers all of the processes from Windows Explorer to Start Menu search box, including the Libraries feature, too. Before following this guide; if the issue has just started please give it a couple of hours to see if it resolves by itself as it may be busy indexing files; if it doesn’t after a couple of hours (6 to 7) then proceed with the steps below. In this guide we will discuss the methods that have proven to fix High CPU Usage by searchindexer.exe
Method 1: Restart Windows Search Service
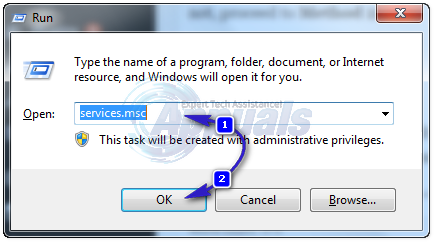
Hold the Windows Key and Press R. In the Run Dialog, type services.msc and Click OK.
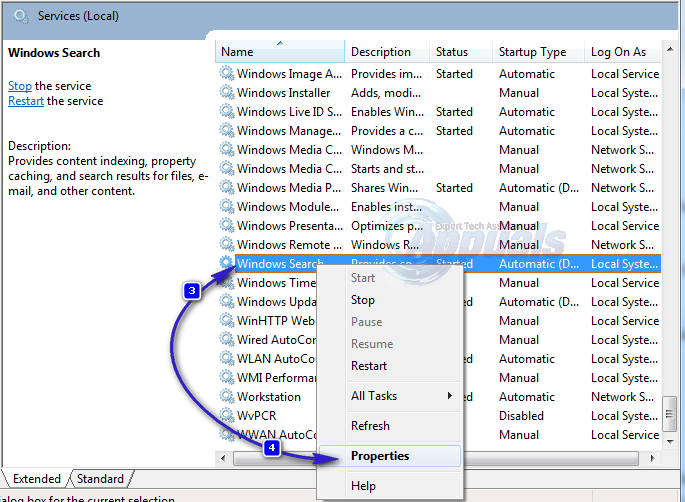
Locate the Windows Search Service, right click on it and choose Properties.
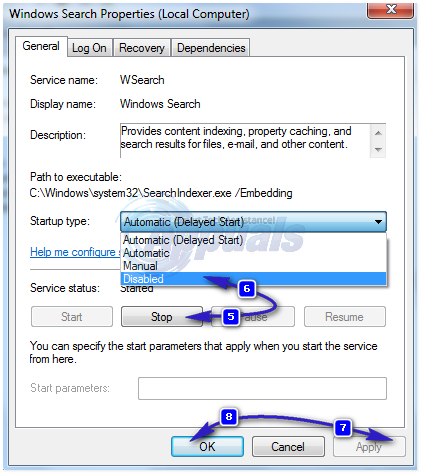
Click Stop and then chose Disable from the drop down menu.
Once done, reboot your system. After the system has restarted, go to services.msc again, right click the service and choose Properties, set the service to Automatic (Delayed Start) and start the service. Wait and test to see if the CPU Usage consumed by searchindexer.exe has dropped. If it is normal, you’re good if not, proceed to Method 2.
Method 2: Rename korwbrkr.dll to korwbrkr.bak
Follow Method 1 to stop Windows Search service. Then click Start and Type CMD. Right Click cmd and choose Run As Administrator. In the Command Prompt; type Press ENTER Key Then type ren korwbrkr.dll korwbrkr.bak Start the Windows Search service, reboot PC and this should fix the issue.
Method 3: Create Process DUMP To Analyse
If nothing works, then this method will help. In fact, Method 2 is derived from this Method. In this method, we will create a dump file of the process searchindexer.exe and then open it to analyse the specific files causing the high cpu usage. To do this, Hold the Windows Key and Press R. In the run dialog, type taskmgr and Click OK. Click the Processes Tab, and locate SearchIndexer.exe – Right click the process and choose Create DUMP File. Once done, note down the dump file location. Next, open it with a Debugger Tools [or upload it to wikisend.com and send us the link in a new question on eQuestions.net/ask] if you want me to analyse it for you otherwise if you can do it yourself; then here’s a sample output of the dump which made it possible to figure out the file causing high cpu usage, as indicated in Method 2 (korwbrkr) – a korean language file, not really needed but may have come up as a result of Windows Updates. However, before renaming or messing up with files; make sure the file is safe to be played with; a quick Google Search will tell what the file us. This method is only recommended for advanced users. also I inspected the problem thread in process hacker, here is the stack: 0, ntoskrnl.exe!SeAccessCheck+0x1ef 1, ntoskrnl.exe!KeDelayExecutionThread+0xc32 2, ntoskrnl.exe!KeWaitForSingleObject+0x1cf 3, ntoskrnl.exe!_misaligned_access+0x809 4, ntoskrnl.exe!SeAccessCheck+0x280 5, ntoskrnl.exe!SeAccessCheck+0x4d1 6, korwbrkr.dll!DllUnregisterServer+0x2f48 7, korwbrkr.dll!DllUnregisterServer+0x243e 8, korwbrkr.dll+0x12173 9, korwbrkr.dll!DllUnregisterServer+0x1696 10, korwbrkr.dll!DllUnregisterServer+0x62f9 11, korwbrkr.dll!DllUnregisterServer+0x6117 12, korwbrkr.dll!DllUnregisterServer+0x5db9 13, korwbrkr.dll!DllUnregisterServer+0x5882 14, korwbrkr.dll!DllUnregisterServer+0x6fa0 15, mssrch.dll!DllGetClassObject+0x3feba 16, mssrch.dll+0x19425 17, kernel32.dll!BaseThreadInitThunk+0x1a 18, ntdll.dll!RtlUserThreadStart+0x21
How to Fix High CPU and Memory Usage By csrss.exeFix: High CPU Usage by OneDrive ‘OneDrive.exe’Fix: dasHost.exe High CPU and Memory UsageFix: High CPU & Memory Usage by ‘Inputpersonalization.exe’


