This warning message is basically a 911 call from your computer to you, and your computer is asking for your help. Getting rid of the “Your startup disk is almost full” warning message is pretty simple – all you need to do is free up space on your startup disk by cleaning it out and getting rid of unnecessary data, and once you do so, the message will go away. Your computer needs you to go on a spring cleaning spree (regardless of what season it is!) and get it back to the way it is supposed to be – the speedy and lightning-fast computer that you know and love. Now before you go ahead with the steps to clear and free up space, you must know how to check the available space, so that you can continue referring to it through out these steps to see how much space have you managed to free up. To check the storage, open Finder.
And and locate your Macintosh HD under Devices in the left pane. CTRL + CLICK on it and choose Get Info.
The two fields you need to look at are the “Capacity and Available“. Capacity tells how much it can store, and available tells how much is available, when you clear up and delete files, the available should increase. The following are the steps you should go through in order to free up space on your Mac’s startup disk and get rid of this warning message:
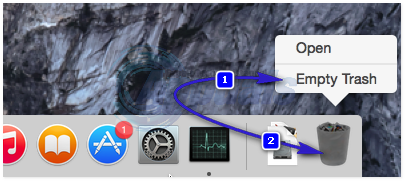
Step 1: Empty your Mac’s Trash
When you delete a file or folder from your Mac, it doesn’t get deleted entirely. Instead, it’s just moved to Trash, provided that it doesn’t occupy a MASSIVELY large chunk of disk space. The first step you need to take towards freeing up space on your startup disk is emptying out your Mac’s Trash as everything in the Trash basically takes up space on your Mac’s startup disk. Hold CTRL, and while doing so, click on Trash in your Dock. Click on Empty Trash. Click on Empty Trash once again to confirm the action.
Mac users need to remember that iPhoto has its own independent Trash, so once you are done emptying your Mac’s main Trash, be sure to hop on over to iPhoto and empty its Trash as well. (Remember this STEP) because after deleting files from other locations, you’ll need to keep on emptying the trash.
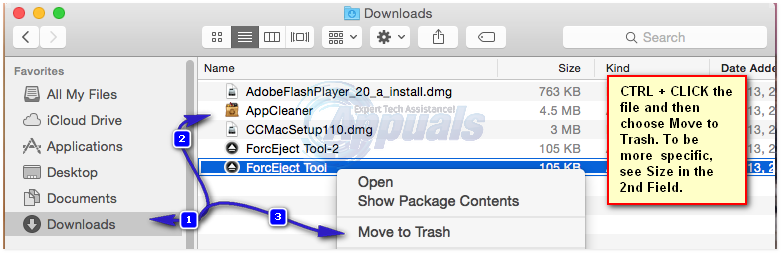
Step 2: Clean out your Downloads folder
The amount of junk that your Downloads folder can accumulate may astonish you. Once you have cleared out the Trash, the next step you need to take is clean out your Downloads folder. Delete any and all files and folders that you no longer need or don’t recognize, and organize what is left of the Downloads folder once you are done.
Step 3: Tidy up your Movies folder
The Movies folder on a Mac is where all of your videos (including those movies and television shows you love to watch so much) are located. Any video, be it a movie or an episode of a television show, can take up a significantly large amount of space. Since that is the case, you need to access the Movies folder and get rid of all the video files you no longer need and won’t be watching any time soon. Getting rid of unnecessary data from the Movies folder can make a huge difference in the amount of free disk space your Mac’s startup disk has.
Step 4: Get rid of music that you no longer listen to
Next on the list of stops you need to make is your Music folder. Open this folder and get rid of all the audio files you no longer need and can bear sacrificing for the health of your Mac, starting with any duplicate audio files that you may have.
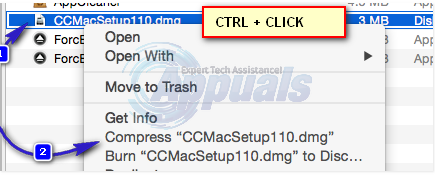
Step 5: Compress as many files and folders you possibly can
If, while cleaning up your Mac, you come across a file or folder that you don’t use very frequently but can’t bear to part ways with, there is a solution – simply compress it. Compressing a file or folder shrinks the amount of disk space that it occupies while at the same time making sure that you can easily access it whenever you want to. To compress a file or folder on your Mac: Press Ctrl and, while doing so, click on the file or folder you want to compress. Click on Compress. Choose your preferences (such as what kind of compressed file – such as .zip – you want to turn the file or folder into) and confirm the action.
Step 6: Clean up your Desktop
Cleaning up your Desktop can not only increase the amount of free disk space your startup disk has but can also help your Mac run a tad bit faster. Simply delete anything on your Desktop that you no longer need and organize the rest of the stuff on your Desktop.
Step 7: Uninstall applications you no longer need
Go to your Applications folder and uninstall any and all applications that you no longer need or use. Be sure to uninstall them the way they are supposed to be uninstalled as simply dragging their folders to Trash can result in lots of their parts and pieces being left behind. see steps here
Step 8: Delete old backups of your iTunes library
Over time, you Mac can accumulate a large amount of backups of your iTunes library, all of which can take up quite a bit of disk space. You can get rid of the iTunes library backups that are a bit more dated, consequently free up disk space on your startup disk. To do so, simply: Open a Finder Click on Go in the menu bar at the top left corner of the window. Click on Go to folder… Navigate to ~/Music/iTunes/Previous iTunes Libraries. Peruse through all the backups, and delete almost all of them, leaving behind only the three-five most recent backups.
Step 9: Erase old iOS backups
Old backups of iOS can take up a lot of disk space, which is why it would be wise for you to remove them. To do so, simply: Open a Finder Click on Go in the menu bar at the top. Click on Go to folder… Navigate to ~/Library/Application Support/MobileSync/Backup/. Remove almost all of the backups, leaving behind only the three-five most recent ones.
Step 10: Delete cache files
When you open an application for the first time, your Mac creates cache files for the application so that it launches faster the next time you open it. Over time, your Mac can accumulate a lot of cache files which can take up a lot of disk space. Removing these cache files, hence, can free up a lot of space on your startup disk. Open a Finder Click on Go in the menu bar at the top. Click on Go to folder… Go to ~/Library/Caches. Delete the files and folders that take up the most space. Click on Go to folder… Navigate to /Library/Caches. Delete the files and folders that take up the most space.
Fix: Your startup disk is fullFIX: Non System Disk or Disk Error Message on StartupFix: Local Disk E Full on Windows 10Fix: The Selected Disk is not a Fixed MBR Disk
![]()