In this article, we will go through a step-by-step guide to adding your email accounts to iPhone both automatically and manually.
Automatic and Manual Accounts
There are two ways that you can add your email account on your iPhone: Let’s have a look at the difference in both configurations
Automatic
When you add an account through automatic configuration, it just simply means that the app will automatically configure your account. This is the fastest way to add your email account and takes about 1-2 minutes. You will need your email address and password, and the rest will be handled by the app. As much as everyone would like to use automatic configurations, it isn’t available for all types of accounts. Mainly, Gmail, Yahoo, Hotmail, AOL and other popular webmail providers can be automatically configured. If you are adding an email account of one of these providers then you don’t have to worry. If you are using some other webmail provider then you will have to switch to manual configuration which isn’t rocket science but takes a little bit more time.
Manual
In manual configuration, as its name suggest, you will have to set up the account manually. This means that you will have to enter the incoming server name and outgoing server name yourself. This would have done automatically in case of automatic configuration but you have to enter these settings yourself if you are adding your account manually. You will mainly use manual configuration when your email account is a custom one or a corporate one. For example, if your company gave you an email account then your mail app might not have the settings for that account. So, you will have to enter it yourself. There are a few things that you need in order to add the account manually but those will be covered later.
IMAP and POP3
You need not be concerned by IMAP or POP3 if you are planning on using automatic configuration. You need to know about IMAP and POP3 only if you are adding your account manually.
IMAP
IMAP stands for Internet Message Access Protocol. It’s an email protocol that, if used, will tell your email client how to deal with your emails. An account that is configured with IMAP syncs across devices and replicates the changes made on your phone to the server. So, this is like your regular email and how it works. Let’s say that you edited an email from your phone and then check that from your computer, it should be updated there too. If you want your email to be just the way it is right now and want to use it from multiple devices then pick IMAP.
POP3
POP3 stands for Post Office Protocol and the 3 stands for the 3rd version. POP3 is another protocol that you can use to configure your email account manually. POP3 is a little bit different from IMAP as in it doesn’t sync the changes to the server. If you pick POP3 while adding your account, your emails will be downloaded to your phone. Since your emails are downloaded and are offline, whatever changes you make to those will not be replicated on your server. This is mainly suited for people who want to keep a backup of their emails on their phone or for people who use just one machine to access emails. Usually people pick this protocol for their business email and use just one computer or phone specifically for business. So, if you are looking for a way to store your emails at a single place then POP3 should be your choice. Knowing about IMAP and POP3 is important because you will be asked to pick the protocol when adding your account manually. You don’t have to worry about which one to pick because you can always remove your added account and add it again with a different protocol. But, it’s good to make up your mind if you don’t want to waste your time.
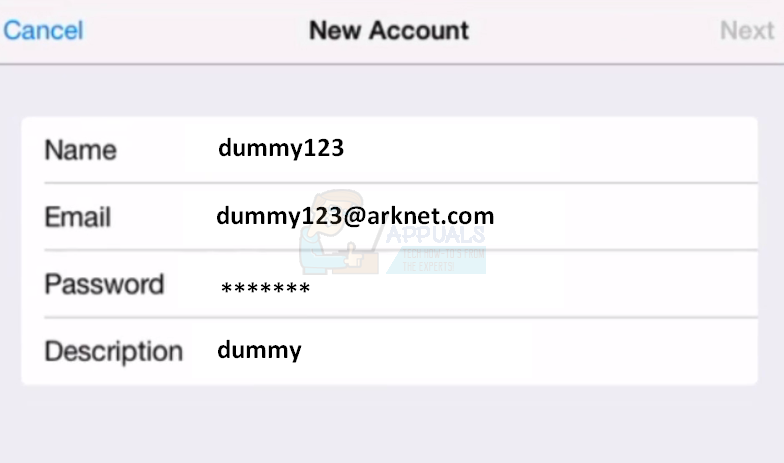
Adding Email Account Automatically
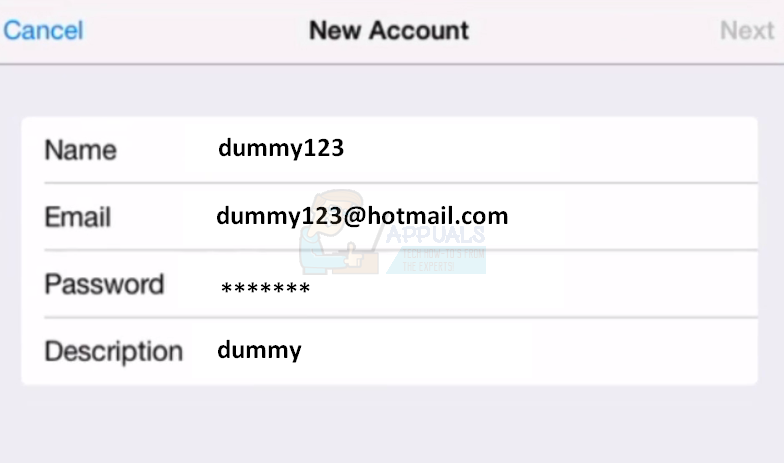
In this article, we will be adding a Hotmail account with automatic configuration. Since the steps of adding an account are pretty much the same, you can use the steps for Hotmail for adding other accounts as well. The information needed to add your email account automatically is given below
Getting the password
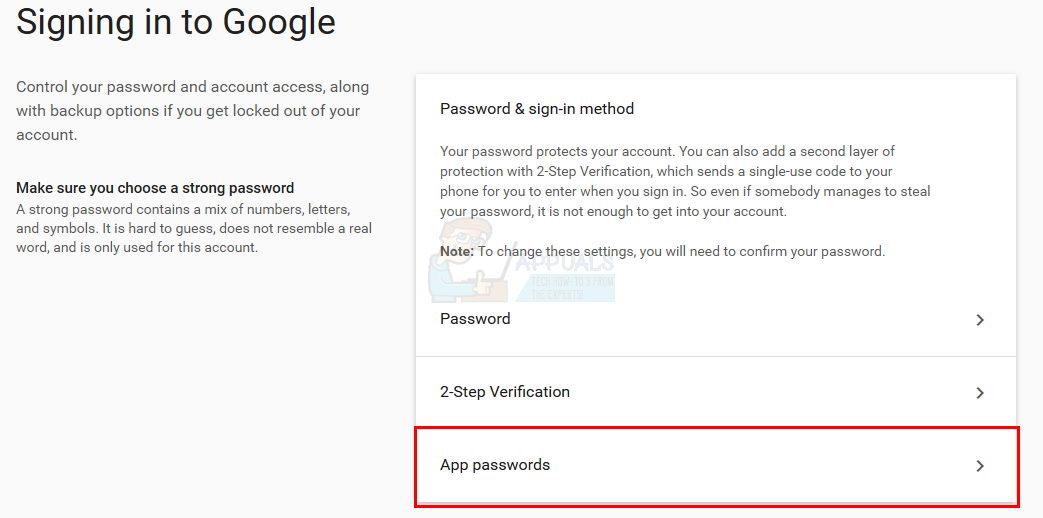
The password you type while adding the account will depend on whether or not you have enabled the 2-step verification system for your account.
2-Step Verification Enabled
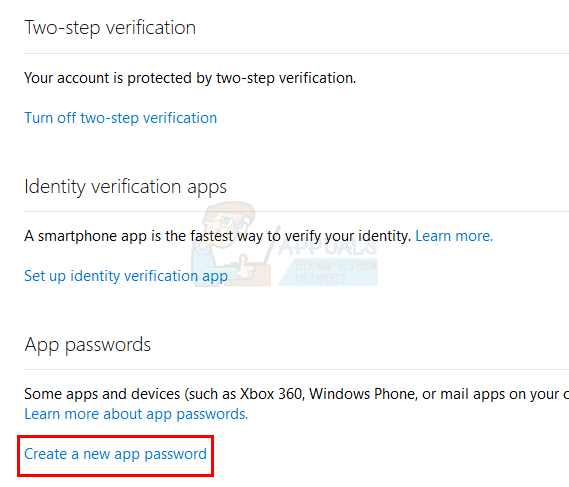
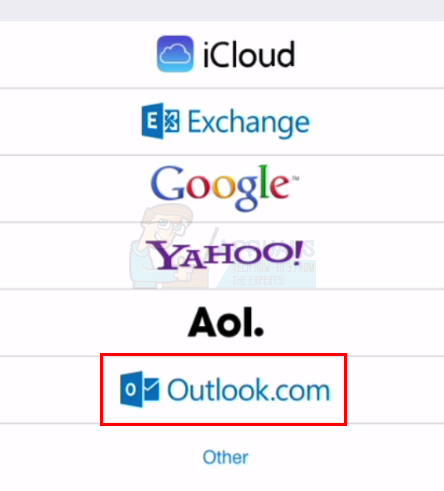
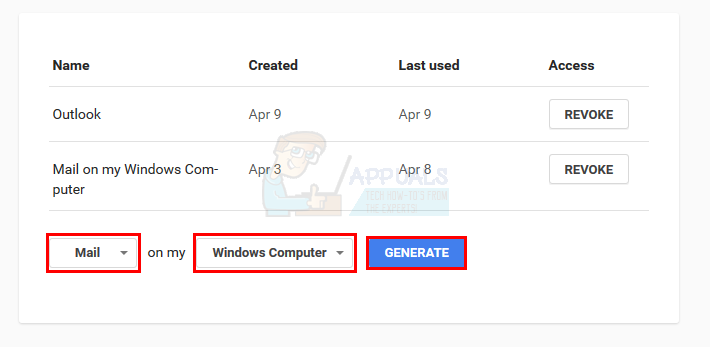
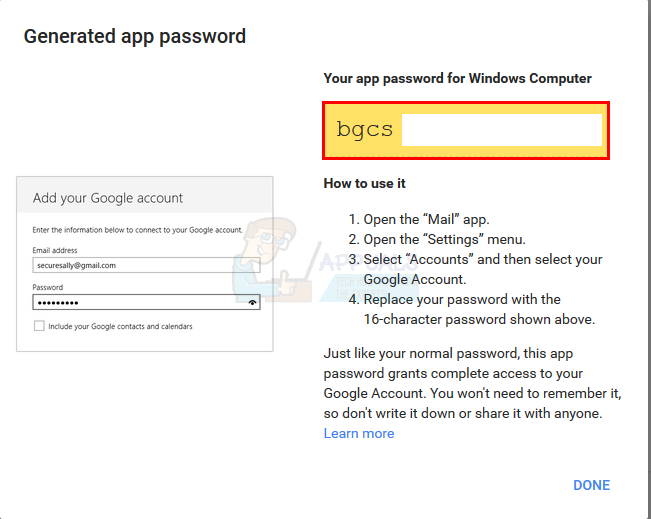
If you have 2-Step verification enabled then you will need to enter an App Password in the password field. You can get your App password by following these steps
2-Step Verification Disabled
If your 2-Step verification system is disabled for your account then you will need to enter your email account’s password in the password field and it will work. Now, follow the steps given below to add your Hotmail account automatically
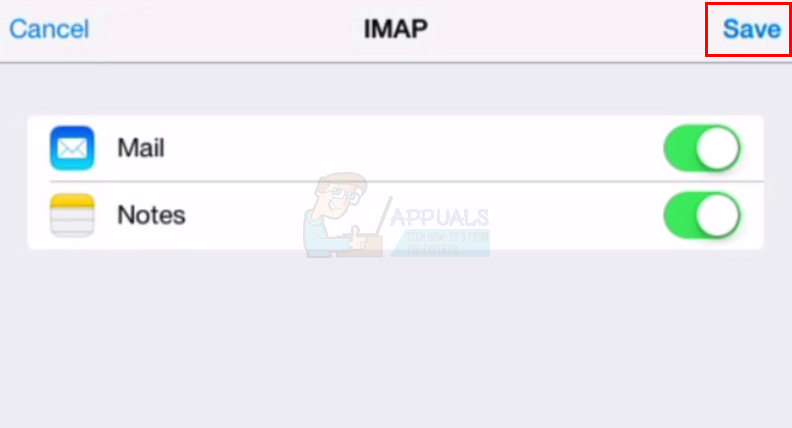
Once it is done, you can change the settings related to sync and your account. Change the settings as per your requirement and click Save
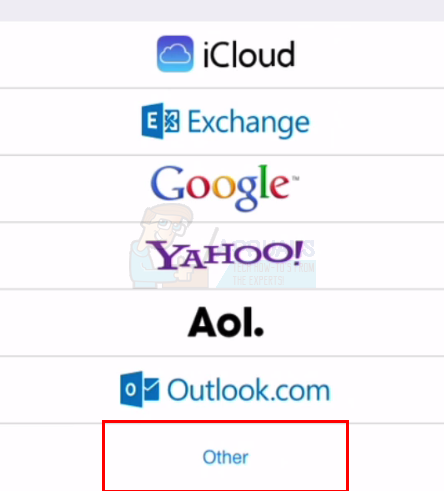
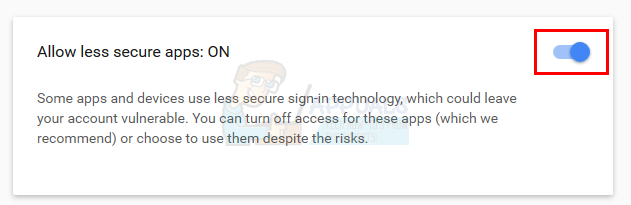
That’s it. Your account is added. You can use the same steps for adding accounts of other webmail providers as well. You will be able to see the providers that are available for automatic configuration like Gmail, Yahoo and AOL etc. If your provider isn’t in the list (the list that appears when you select add account) then you should go with the other option which is the manual configuration. The manual configuration will be covered in the next section. Another thing to keep in mind is that sometimes you won’t be able to add your account automatically even if the email or password is right. This will happen if your “Allow less secure apps” option is disabled in your email account. The “Allow less secure app” option will appear when you have 2-step Verification Disabled. Some accounts don’t have that option and you can use your password without any problem but other accounts might need that option enabled for your password to work. So, you’ll have to check your account to see whether this option is there or not. Gmail and Yahoo will have this option so turn that on if you are having trouble signing in.
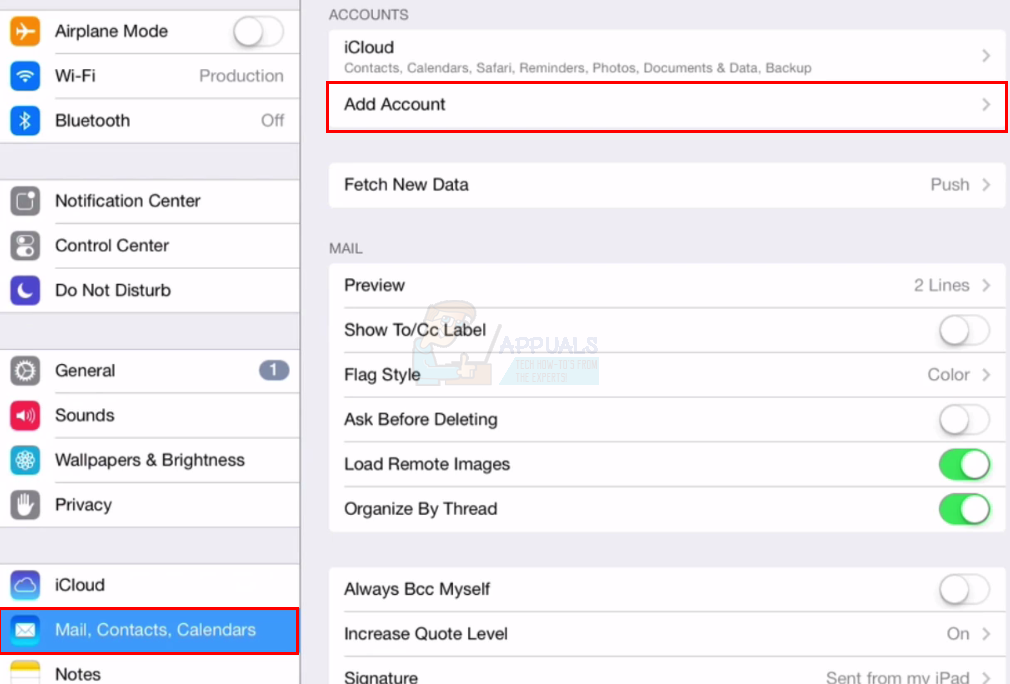
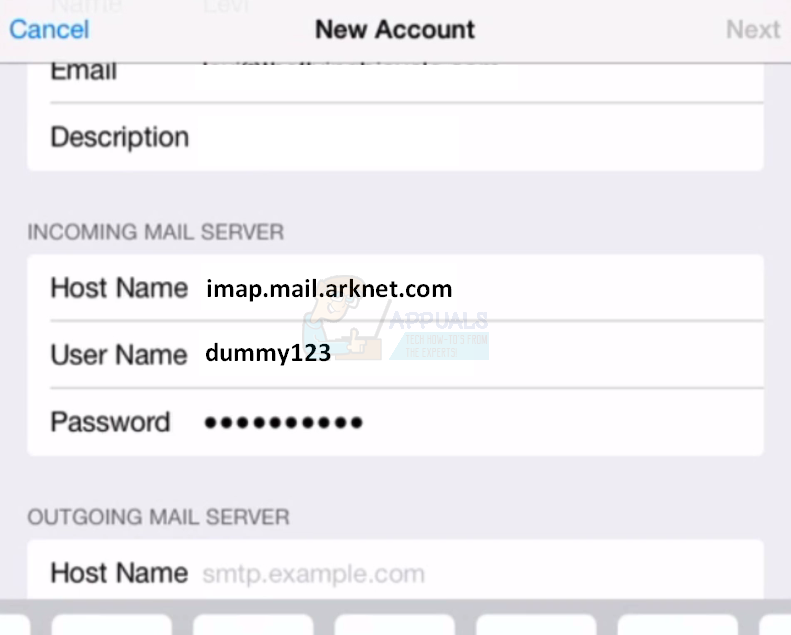
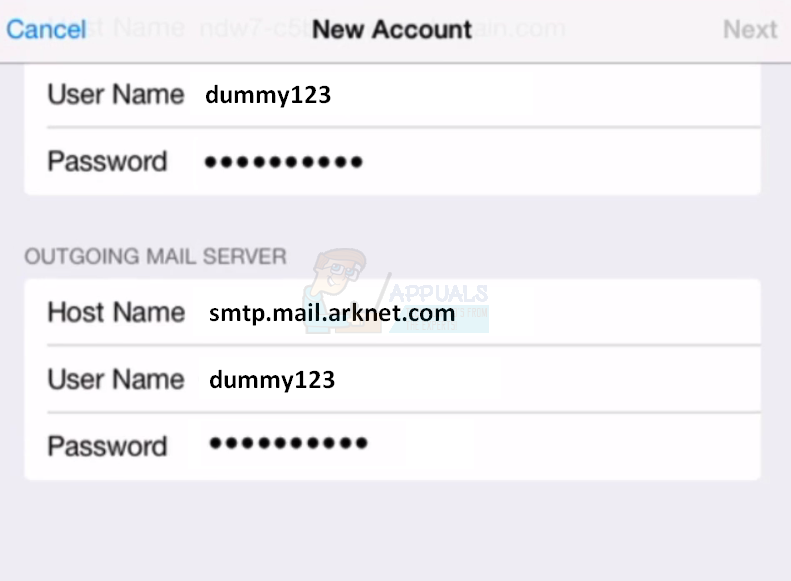
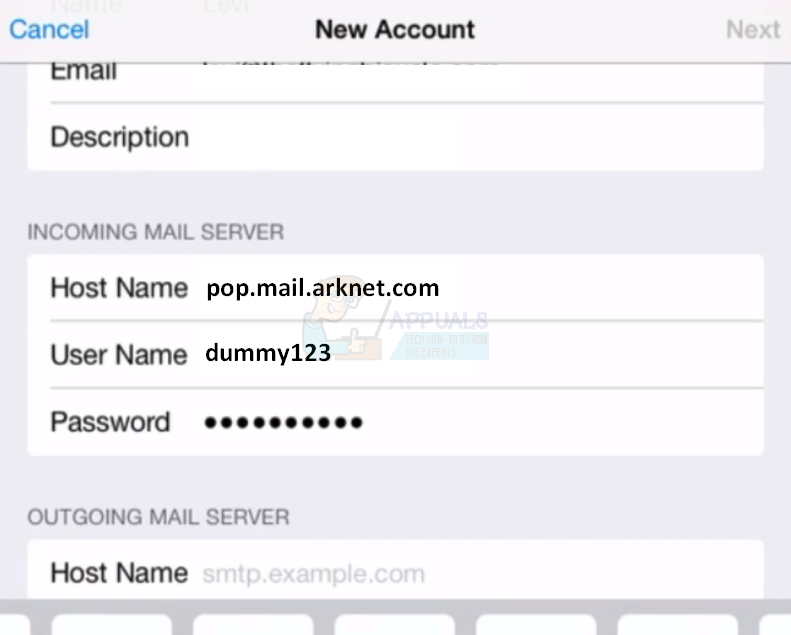
Adding Email Account Manually
As mentioned before, the information that is needed to add your account manually is not the same when you add your account automatically. So, here’s the information that you will be needing when adding your account manually Things needed to add account via Manual Configurations The password that you will be using will depend on whether you have your 2-Step Verification Enabled or Disabled. If you have your 2-Step Verification Enabled then you will need the App password generated from your account to add your email successfully. You will use that App Password instead of your regular email account password. If you have 2-Step Verification Disabled then you can use your email account’s password. But don’t forget to enable the option that says, “Allow less secure apps” otherwise you will have problem in signing in with your regular password as well. If you want a step by step instruction set then look at the Getting the password section above. Since we already know that you can use both IMAP and POP3 to configure your account manually, we will go through the steps for both IMAP as well as POP3 in this section. Let’s first have a look at IMAP.
IMAP
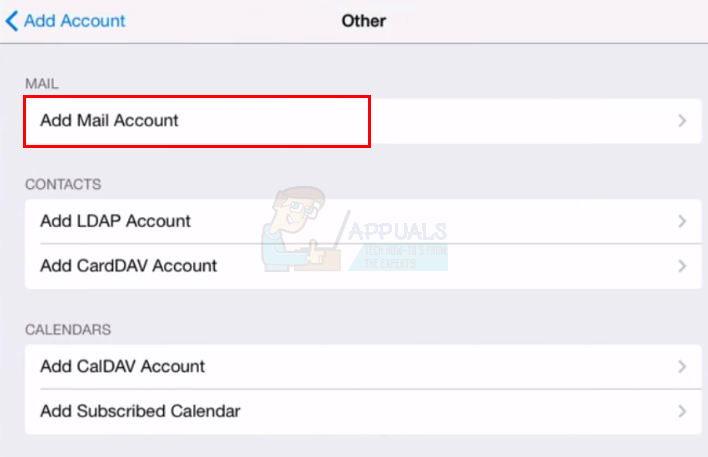
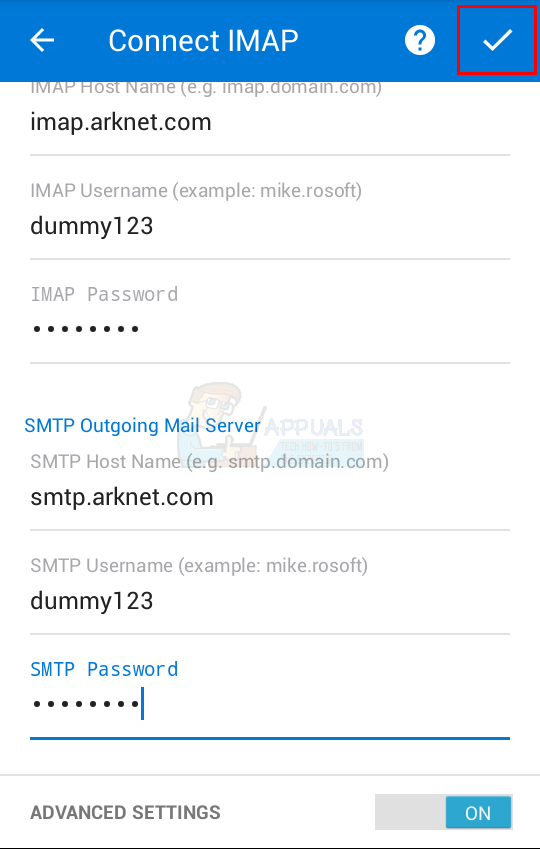
The steps for adding an account manually with IMAP are given below.
POP3
The steps for adding an account manually with POP are given below.
Adding Email Account in Outlook
Another very common way of adding your email account to your iPhone is the use of Outlook app. Yes, the Outlook that you used on your Desktop has an Android and iOS app available in the market. Although it lacks some features but it certainly is a very good way of managing emails and delivers more than enough features to be considered a productive app.
Automatic Configuration
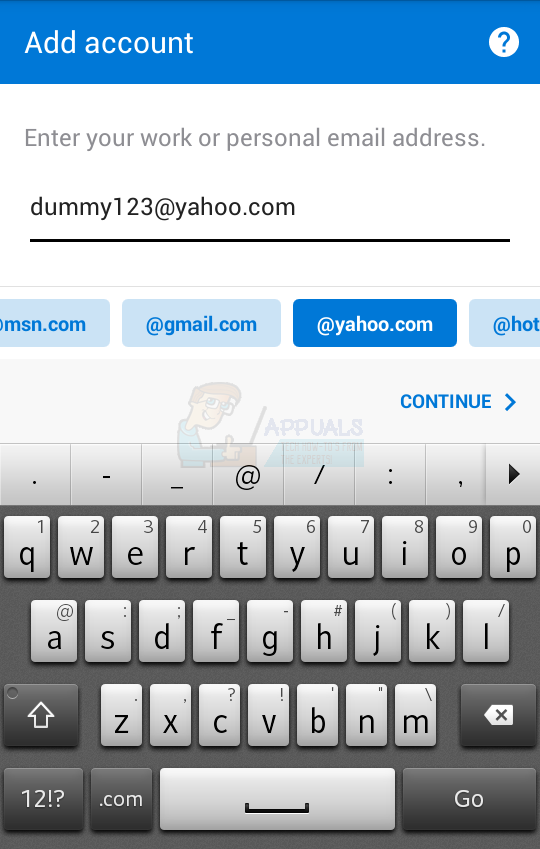
The process of adding your account with automatic configuration is very simple and is similar to other apps. You can add Yahoo, Gmail, Hotmail, Live and various other accounts to configure your account automatically. In fact, you will see the list of webmail providers while typing your email address (covered later in this section). Even if your webmail provider isn’t in the list mentioned there, try to add it anyways. If it fails, then switch to the manual configuration. So here are the steps to adding your account to Outlook automatically.
Getting the password
The password you type while adding the account will depend on whether or not you have enabled the 2-step verification system for your account. 2-Step Verification Enabled If you have 2-Step verification enabled then you will need to enter an App Password in the password field. You can get your App password by following these steps
2-Step Verification Disabled If your 2-Step verification system is disabled for your account then you will need to enter your email account’s password in the Microsoft Outlook’s password field. But you need to enable the Allow less secure apps option for your account. Follow the steps given below to enable this option (if it isn’t already)
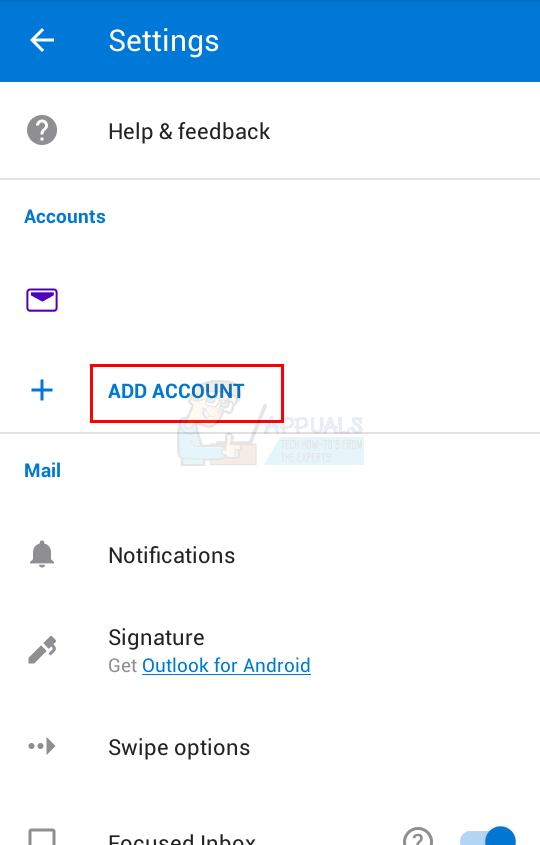
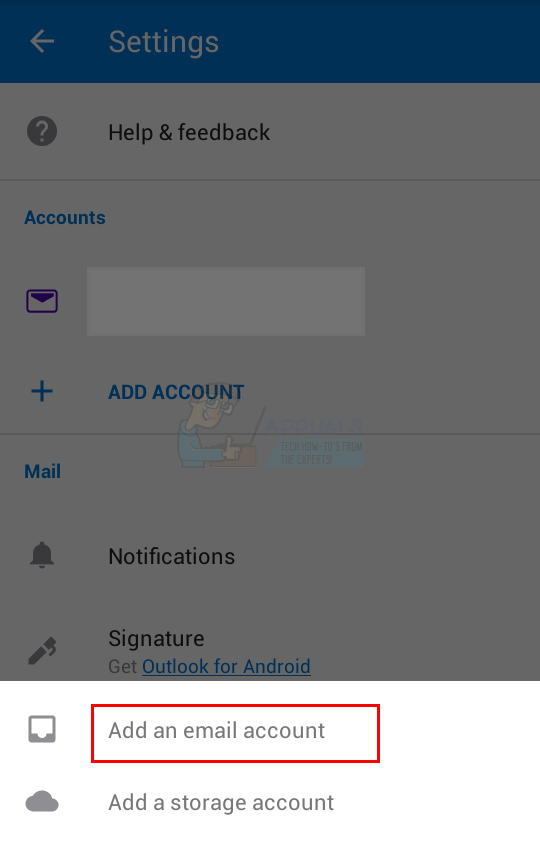
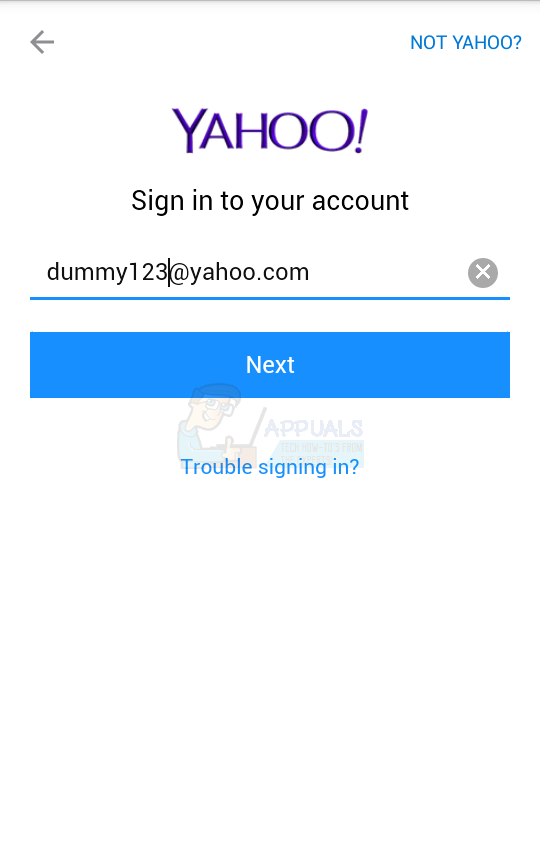
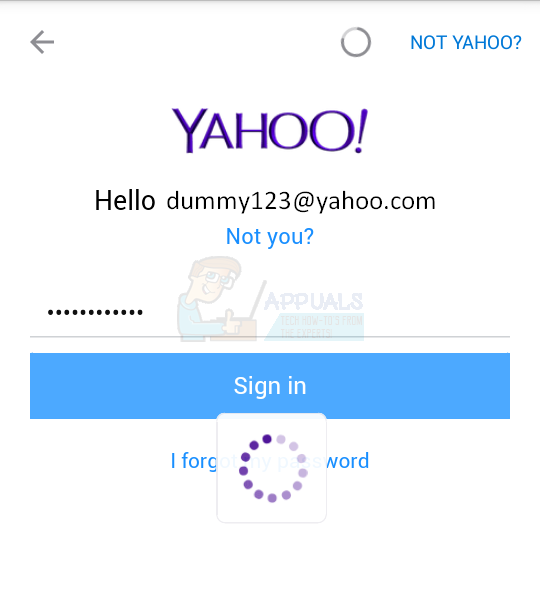
Now follow these steps to add your email account to Outlook
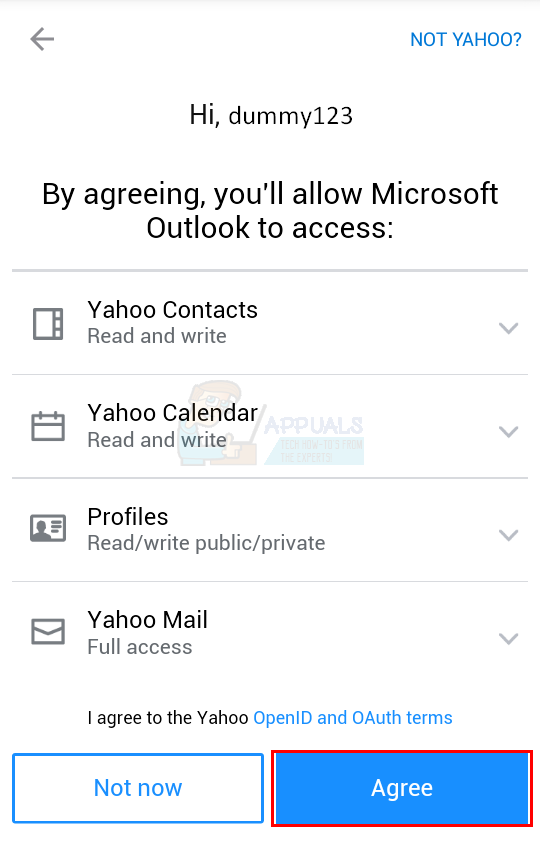
You can use the same steps above to add other email accounts as well. The list of webmail providers that you can add automatically will appear in step 5. Keep in mind, if you can’t add your account despite writing the right password and having 2-Step Verification Disabled, make sure that you have enabled the “Allow less secure app option” from your account.
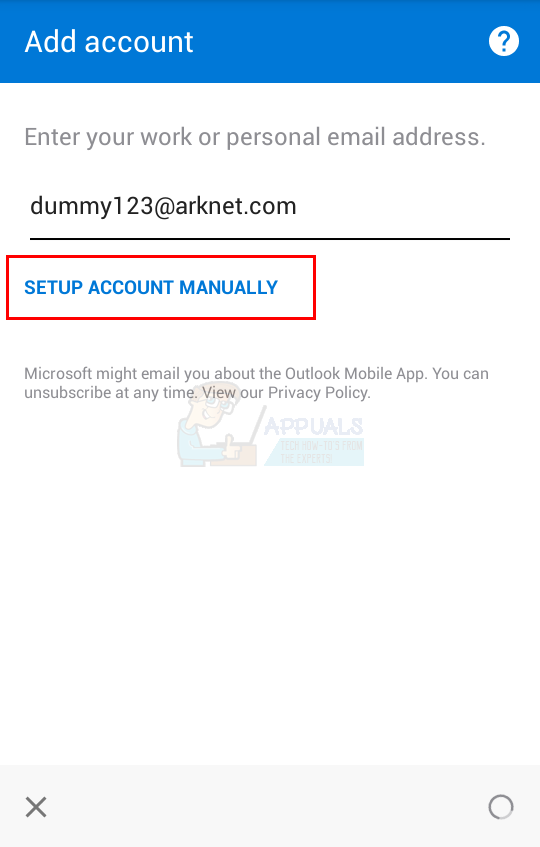
Manual Configuration
Now, while adding your account with manual configuration, you will need a little more information as compared to the automatic configuration. Things needed to add account via Manual Configurations The exact information that will be required to add your account manually. Getting the Password If you aren’t sure which password to use, you can check the section Getting the Password in the automatic section above.
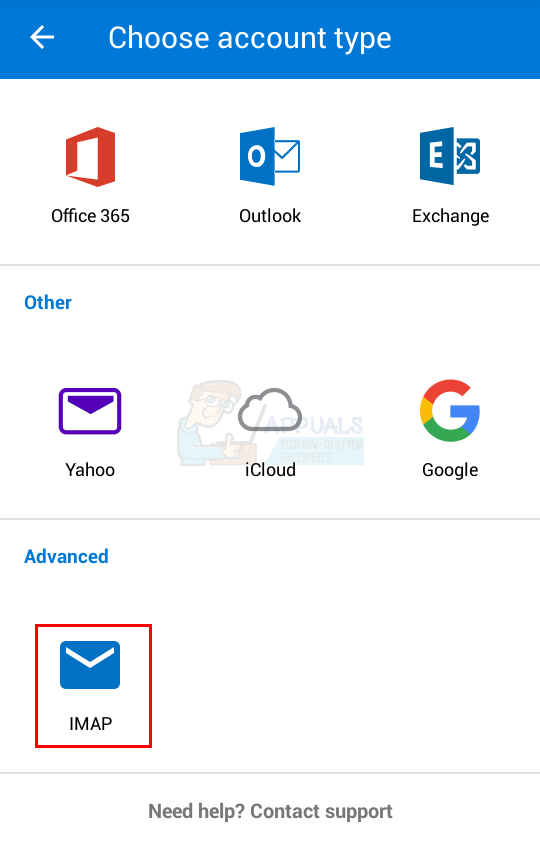
IMAP
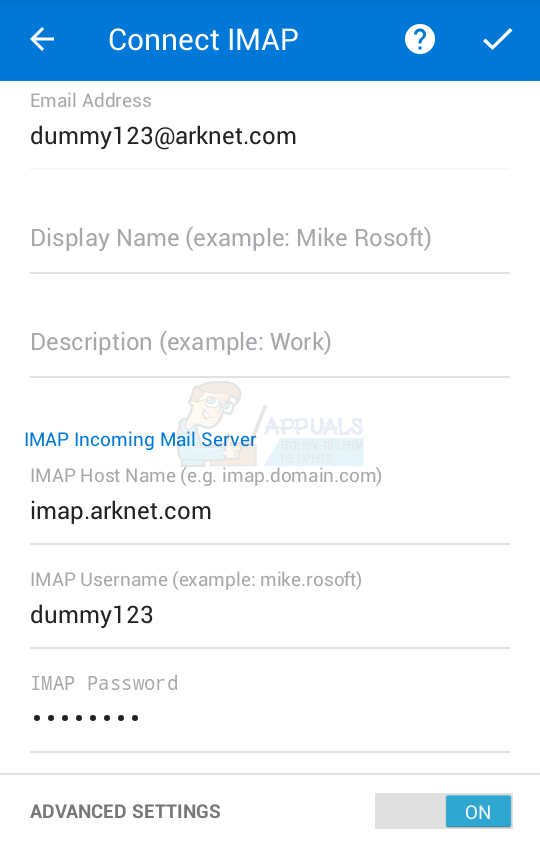
Follow the steps given below to add your account with IMAP
POP3
Outlook for Android and iPhone doesn’t support the POP3 accounts yet. But these are planned of getting released later on.
Other Accounts
By following the steps given above for the IMAP, you can add other email accounts pretty easily. The steps will be the same for other accounts as well. The only thing different for other accounts will be the email address
How to Add Email Accounts to Android PhoneHow to Use Temporary or Disposable Email AccountsHow to Add Email Account to Microsoft Outlook 2016How to Add Another Email ID for Current Facebook Account?