A website that loads quickly is key. In addition to streamlining your site, you will want to make sure that your hosting provider isn’t acting as a bottleneck (and if your host is slowing you down, consider finding one for whom speed is a priority. To present users with the best possible experience in terms of speed and appearance, we recommend that you build an app. Apps provide better mobile experiences for users. They are faster, easier to use, and aren’t as awkward as mobile browsers that might not display your site correctly. But, app development isn’t cheap. So, for those of you who are on a budget, consider converting your WordPress site into an app, rather than building one from scratch. This article will show you how.
Converting Your WordPress Site into an Android App Using AppPresser
Using a plugin is one of the easiest ways to convert your WordPress site into an Android App. Most of the apps available are premium offerings, but their cost is still significantly less than raw app development. For this tutorial, we will use AppPresser. AppPresser is the most popular plugin for website-to-app conversions. (We’ve included alternatives to this plugin below the tutorial as well as options for non-WordPress sites.) The conversion process requires three main steps: Let’s take a closer look at each step in detail.
Install the AppPresser Plugin and Theme
The AppPresser plugin is available in the WordPress repository. Alternatively, you can find in through the Dashboard by going to Plugins > Add New and searching for AppPresser. Install and active AppPresser. Note: AppPresser is not a free plugin, so you will need to purchase a subscription before you can proceed. Next, you need to download the AppPress theme and upload it to WordPress. You can find the AP3 Ion Theme download link in one of two places: Once you’ve downloaded the theme, upload it to WordPress by going to Appearance > Themes > Add New > Upload and selecting your file. At this point, do not activate the theme, since the plugin will switch this theme on/off for use in the mobile app you’re creating.
Create Your App
Once you finalize your purchase of AppPresser, you’ll be redirected to the dashboard where you can create your app. Your login credentials are provided in your purchase confirmation email. Once you’ve logged in, you can create a new app by clicking New App. Provide a name for your app and click Create App. When done, you’ll see a box on your dashboard that represents your newly-created app.
Customizing Your App
The process we just described gets you a generic default app, but we want one that’s based on the WordPress site. Here’s how to do this. Click the box representing your newly-create app. In the screen that appears, click Customize and Build App to proceed to the App Customizer. At the bottom of the App Customizer’s left-hand navigation bar, click Add Items and open the WordPress/External Links drop-down. Provide the:
URL (be sure to begin the URL with https:// so the preview works) to the WordPress page that has the AppPresser theme and plugin installedTitle using the Link Text field
Click Save. You’ll see the preview update with your custom app.
Configure the AppPresser Settings
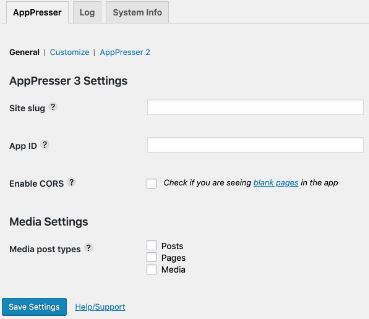
The final thing you need to do is to provide information about your AppPresser account to your WordPress plugin. When logged in to Dashboard, click the AppPresser icon displayed in the left-hand navigation bar. You’ll be redirected to a page that displays the plugin settings. Provide the Site slug and App ID values, which are given to you after you created your first app with AppPresser. Click Save Settings.
Building Your App
The final step is to build you app for testing and shipping to the app stores for review. If you want to complete these tasks with AppPresser, you’ll need to create an account with PhoneGap Build and obtain an authentication token. Once you complete this process, you’ll get a QR code you can use to download your Android app.
Other Plugins You Might Consider
AppPresser isn’t the only plugin option that offers users the ability to convert WordPress pages to Android apps. Others that you might want to look into include:
AndroappMobiLoudWPMobile.App
Converting a Non-WordPress Site into an Android App
In this article, we’ve focused on converting a WordPress site into an Android app. But, there are options available to you even if you aren’t using WordPress as your CMS. Convertify gives you the option of purchasing packages that help you convert your website to an Android app, an iOS app, or both. Convertify is simple to use: all you have to do is send the company your website URL, your desired app name, and your logo. They will do the rest. GoNative.io is an option for those who want to convert their website into apps for both Google Play and Apple’s App Store. GoNative.io isn’t cheap, but it is cheaper than developing an app from scratch. The company guarantees Apple and Google will accept your app for inclusion in their stores.
Summary
Mobile apps present users with the best possible experience, but developing one from scratch is expensive. If you have a WordPress site, you can save time and money by converting it into an Android app for your users.
Fix: Wordpress HTTP Error when Uploading MediaHow to Fix WordPress Database Connection ErrorHow to Build Advanced and Professional Looking Forms For Your Wordpress Powered…FIX: Asus Computer Boots Into Aptio Setup Utility Instead of Booting Into its OS

